Java Course Content:
-------------------------
What is java.
Java Features
JDK Setup.
First java program
Java fundamentals
1)Variables
2)Data types
3)Operators
4)Control statements.
5)Arrays.
Object -Oriented Programming.
1)Object
2)Class
3)Encapsulation.
4)Constructors.
5)Use of this and super keywords.
6)Inheritance.
7)Polymorphism.
a)Method
Overloading.
b)Method
Overriding.
8)Abstraction
a)Abstract class
b)Interface.
9)Access Modifiers.
10)Composition, Aggregation, cohesion.
Object class methods.
Strings, String Buffer, String Builder and String Tokenizer.
Wrapper classes, Auto boxing and Auto unboxing.
Exception Handling.
Generics.
Enums.
Collection Framework.
what is collection.
Difference b/n Arrays and
Collection.
Collection Heirarchy.
Lists(ArrayList,LinkedList,Stack,Vector).
Sets(HashSet,LinkedHashSet,SortedSet).
Queues
Cursers(Enumerator,Iterator,ListIterator).
Map(HashMap,LinkedHashMap,TreeMap,Hashtable,Properties).
Sorting(Comparable,Comparator).
what is java?
-Java is a programming language created by James gosling in
early 1995 at sun microsystems later own by Oracle corporation.
-Java is platform independent programming language that
follows the logic of “write once, runs anywhere”.
There are 4 different platforms in java.
1)Java SE(Java standard edition).
-J2SE is basically used for developing client side
applications.
-It includes java fundamentals, oops, Strings, Exception, Multi
threading,Collections etc).
2)Java EE(Java enterprise edition).
-J2EE is used for developing server side applications.
-it includes servlets, jsp, RMI,EJB ,REST API etc).
3)Java ME(Java micro edition):
-This edition used to develop the mobile apps.
4)Java FX:
-This is used to develop the rich UI based applications.
ex:JSF.
Java features:
1)Simple:
-java is very easy to learn and its very clean, and also it
follows c++ syntax.
2)Object-oriented:
-Java is object oriented because it follows object oriented
methodologies.
-In java everything we represents as objects.
-Basic concepts of oops are:
1.objects.
2.class.
3.Inheritance.
4. Polymarphism.
5.Abstraction.
6.Encapsulation.
3)Portable:
Java is portable because of we can transform the byte code
to any other platforms.
4)Platform-independent:
Java is Platform independent because the compiler
generates the byte code ie .class file.so that we can run this on any platform like windows,linux,mc os ,solaris etc.
5)Secured.
Java secured because of
-There is no
explicit pointers.
-Java provides
run time memory in JVM not in OS run time memory.
-Byte code verifier
checks whether the byte code is valid or not.
-Security manager
provides the security.
6)Robust:
Java uses strong memory management in JVM.
-There is no explicit
pointers in java.
-There is a Garbage collector which runs on the virtual
machine to clean up the unused java
objects.
-Exception handling mechanism prevents run time errors.
7)Architectural neutral:
The size of java primitive types are fixed in 32 bit os
and 64-bit os where as other languages it varies.
8)Multi threaded.
we can write java programs that executes many tasks in parallel
by multiple threads.
9)Distributed:
Java is distributed to many other platforms via RMI and
EJB, web services(SOAP,REST).
How to Install JDK on windows:
Step 1: Download JDK
- Goto Java SE download site @ http://www.oracle.com/technetwork/java/javase/downloads/index.html
-Download any java version for windows i.e. either for
32-bit or 64 bits os.
Step 2: Install JDK
-Run the downloaded installer.
-By default, JDK is installed in directory "C:\Program
Files\Java\jdk-8.0.{x}".
Step 3: Include JDK's "bin" Directory in the PATH
1)Set the temporary path:
-In command prompt go to working directory and run the
following command.
>set path=C:\Program Files\Java\jdk-8.0\bin;
>javac -version
2)Set the Permanent path on windows.
-Right Click My computer->Properties->"Advanced
system settings"->Advanced tab->"Environment Variables"
button.
-Under "System Variables" (the bottom pane), scroll
down to select variable "Path" -> Click "Edit...".
-Enter the Variable value : c:\Program
Files\Java\jdk-8.0\bin;[do not delete exiting entries...]
Write a Hello-World Java Program:
----------------------------------
-Create a directory to keep your works, e.g.,
"d:\java".
-Launch a programming text editor (such as Notepad, TextPad,
NotePad++).
-Begin with a new file and enter the following source code.
Save the file as "Hello.java" in your working directory.
public class Hello {
// Save as "Hello.java"
public static void
main(String[] args) {
System.out.println("Hello, world!");
}
}
-Compile and Run the Hello-World Java Program
d:\java> javac Hello.java
if there is no syntax
error then the javac compiler will generate the Hello.class file in D:/java
folder.
-To run the program, invoke the Java Runtime
"java":
d:\java > java Hello
java Hello
Output:
Hello, world!
Language fundamentals:
1)Identifiers/Variables.
2)Types of variables.
3)Data types.
4)Operators.
5)Control statements.
6)Arrays.
1)Identifiers/Variables:
-The Variables are used to identify the class names, methods,
variables and labels.
Ex:
class student
{
public static void main(String arg[])
{
int studentId;
}
}
Note:Here student,main and studentId are identifiers.
Rules to declare the vairables:
1)Any variable should starts with alpabets or $
a-z,0-9,-,$.
2)There is no length limit in java variables. but it's
recommended to declare the variable with 15 chars.
3)Java identifiers are case sensitive.
ex:int a=10;
int A=10;
Here java compiler
treats a and A are different.
4)Reserved words are not used in variable declaration.
Reserved words in
java: int,byte,char,short,float,double etc.
ex:int chars;
//wrong
5)we can use the predefined class names as a variable.
Predefined classes:
String,System,Object etc.
ex:int String=10;
Examples:
int num; //valid
int total_num;
//valid
int .num; //invalid
int 123a; //invalid
int $123a; //valid
int %percentage;
//Invalid
2)Types of variables:
There are 3 types of variables in java.
1)Local variable.
2)Instance variable.
3)static variable.
1)Local variable:
-Local variables should be declared inside a method.
-we can access local variables inside the method only but
not outside method or outside class.
-you cannot declare the local variable as static.it leads
compile time error.
-The life time of local variable is scope of method execution.
2)Instance variable:
-Instance variables should be declared inside the class but
outside the method.
-Instance variable are specific to the instance but not
sharing to other instance.
-The scope of instance variable is life time of instance.
-There is no need to provide values at the time of
declaration. JVM will provide the default values.
3)Static variable:
-Static variable should be declared a static inside the
class but not in the method.
-Local variables shares the content to all the instances of
that class.
-Memory allocation happened only at the time of class
loading but not at the time of object creating.
-There is no need to
specify the default values. jvm will provide the default values.
Example:
public class Identifiers {
int
data=50; //instance variable
static
int m=100; //static variable
public
static void main(String[] args) {
Identifiers
obj1=new Identifiers();
obj1.data=150;
obj1.m=200;
Identifiers
obj2=new Identifiers();
obj2.data=250;
obj2.m=300;
System.out.println(obj1.data+"
--" +obj1.m);
display();
}
public
static void display()
{
int
local=10; // local variables.
System.out.println("local:"+local);
}
}
output:
150 --300
local:10
3)Data types in java:
-Data types are used to specify the type of variables.
There are two types in java.
1)Primitive data type:
Byte,short,int,long,float,double,boolean,char.
2)Non-Primitive data types:
classes,interface
and Arrays.
ex:String,StringBuffer,StringBuilder etc.
1)Primitive data types:
1)Byte data type:
-Byte is used to store a small a numerical value.
-size of byte data type is 1 byte[8 bits].
-Range is -128 to 127.
-Default value is 0.
ex:
byte a=10; //valid
byte a=127; //valid
byte a=128; //invalid
byte a=-128; //valid
2) short
-used to store 16 bit two's complement numerical value.
-Size is 2 bytes[16 bits].
-Range is -2 power of 15 to 2 power of 15-1=-32768 to 32767.
-The default value is 0.
Ex: short a;
short a=1500;
short a=40000;
short a=10;
3)int
-This is the common data type used in java.this is used to store
the 32 bit 2's complement numerical value.
-size=4 bytes[32 bits]
-Range = -2 power of 31 to 2 power of 31-1
=-2147483648 to
2147483647.
--Default value is 0.
Ex: int a; // 0
int a=20; //valid
int a=200000;
//valid
int a=2147483648;
//invalid
4)long:
-This is also commonly data type used in java. Long is used
to store the 64 bit 2's complement
numerical value.
-size is 8 bytes[64 bits]
-Range = -2 power of 63 to 2 power of 63-1
=-9223372036854775808 to 9223372036854775807.
--Default value is 0.
Ex: long a =100;//valid
long
a=9223372036854775808; //invalid
long
a=9223372036854775807 ;//valid
5)float:
-used to store the
real values which is a numerical values contains the decimal places.
-size is 4 bytes
-Range=-3.4 *10 power
of 38 to 3.4 * 10 power of 37
-if 6 to 7 decimal
places of accuracy required than we should go for float.
-The default value is
0.0f.
Ex: float amount; //0.0f;
float
amount=150.50; //valid
float
amount=150.123456789; //invalid
6)double:
-used to store the
real values which is a numerical values contains the decimal places.
-size is 8 bytes.
-Range=-1.7*10 power
of 308 to 1.7 * 10 power of 307
-if 14 to 15 decimal
places of accuracy required than we should go for double.
-The default value is
0.0d.
Ex:
double amount;//0.0d
double
amount=1567.3434344;//valid
double
amount=120000.123456789012345678;//invalid
7)Boolean:
-used to store only
two possible values that is true or false.
-size is not
applicable[jvm will automatically provide the size].
-Range is not
allowed.
-Default value is
false;
Ex:
boolean flag; //false
boolean flag=true;
//valid
boolean flag=TRUE;
//invalid
boolean flag=1;
//invalid
8)Char
-char is used to store the available character set in single
quotes.
-size is 2 bytes[16bits].
-Range is 2 power of 16 [0 to 65535].
-java supports uni code character set instead of ASCII code.
Note :The ASCII code
of A=65,B=66 etc.
Ex:
char ch='A'; //valid
char ch='1'; //valid
char ch='%'; //valid
4)Operators in java:
-operators are used
to perform operations.
-There are many
types of operators in java.
1)Unary
operator.
2)Assignment
operator.
3)Arithmetic
operator.
4)Relational
operator.
5)Logical
operator.
6)Bitwise
operator.
7)Shift
operator.
8)Ternary
operator.
1)Unary operators.
-Used to
increment/decrements a value by one.
-unary operators are
++,--.
Ex:
int a=10;
System.out.println(a++);//
10
System.out.println(++a);//
12
System.out.println(a--);
//12
System.out.println(--a);
//10
2)Assignment operator:
-used to assign a
value to the variable.
-There is only one
assignment operator in java ie =.
Ex: int
a=10;
System.out.println(a);
// 10
a+=10;
//a=a+10-> a=10+10=a=20
System.out.println(a);
//20
a-=5;
//a=a-5;-> a=20-5=15;
System.out.println(a);
3)Arithmetic operators:
-used to perform
addition, subtraction, multiplication and division.
-Arithmetic operators
are +,-,*,/,%.
Ex:
int a=10;
int
b=5;
System.out.println(a+b);
//15
System.out.println(a-b);
//5
System.out.println(a*b);
//50
System.out.println(a/b);
//2
System.out.println(a%b);
//0
4)Relational Operator:
-Relational operators
are used to check the relation b/n two conditions.
-The relational
operators are <,<=,>,>=,==,!=
Ex:
int
a=10;
int
b=5;
System.out.println(a<b);
//10<5=false
System.out.println(a<=b);
//10<=5=false
System.out.println(a>b);
//10>5=true
System.out.println(a>=b);
//10>=5=true
System.out.println(a==b);
//10==5=false
System.out.println(a!=b);
//10!=5=true
5)Logical Operators:
-Logical operators
are used to combine one or more conditions.
-Logical operators
are &&,||,!
Ex:
int a=10;
int b=5;
int c=20;
->In the logical AND operation both the condition should
be true then the result will be true otherwise the result
will be false.
System.out.println((a<b)&&(b<c));
//(10<5)&&(5<20)=false&&true = false.
->In Logical OR operation if either of the condition is
true than the result is true.
System.out.println((a<b)||(b<c)); //(10<5)||(5<20)=false||true
= true
->In Logical !(Not) true becomes false ,false becomes
true.
System.out.println(!(a<b));//!(10<5)=!false=true
6)Bitwise operators:
-Bitwise operators
are used to perform one or more bitwise operations.
-Bitwise operators
are &,|,^ (XOR),~(Complement).
-Bitwise AND operation both bits should be true than the
result is true.
-Bitwise OR either of the bit is true than the result is true.
-Bitwise ^(XOR) only one bit should be true than the result
is true.
-Bitwise ~(Complement) converts 1's to 0 and 0's to 1.
Ex:
a b a&b
a|b a^b ~a
---------------------------
1 1 1
1 0 0
1 0 0
1 1 0
0 1 0
1 1 1
0 0 0
0 0 1
Ex:a & b
a= 1 0 1 0
b= 0 1 0 1
-----------
0 0 0 0
-----------
Ex: a|b
a= 1 0 1 0
b= 0 1 0 1
-----------
1 1 1 1=8+4+2+1=15
-----------
Ex:a^b
a= 1 0 1 0
b= 0 1 0 1
-----------
1 1 1 1==8+4+2+1=15
-----------
Ex:~a
~a= 1 0 1 0 =0 1 0 1=-11
Example:
int
a=10;
int
b=5;
System.out.println(a&b);
//1010 & 0101 =0
System.out.println(a|b);
// 1010 | 0101=15
System.out.println(a^b);
// 1010 ^ 0101=15
System.out.println(~a);
// ~1010 =-11
7)Shift operators:<<,>>
-left shift operator is used to shift the bit to left side.
-Right shift operator is used to shift the bit to right
side.
Ex: <<
System.out.println(10<<2);//10*2^2=10*4=40
System.out.println(10<<3);//10*2^3=10*8=80
System.out.println(20<<2);//20*2^2=20*4=40
Ex: >>
System.out.println(10>>2);//10/2^2=10/4=2
System.out.println(10>>3);//10/2^3=10/8=1
System.out.println(20>>2);//20/2^2=20/4=5
8)Ternary Operators:
-Ternary operator is used as alternative for if else block.
Syntax: Condition?exp1:exp2;
if condition is true
than exp1 will be executed.
if condition is false
than exp2 will be executed.
Ex:
int a=10;
int b=5;
(a<b)?sop(a):sop(b);
(10<5)-false
output:5
Assignment:
1)Program to calculate the average of 5 numbers.
2)Program to find the area of rectangle.
3)Program to calculate the total marks for the given
subjects(eng,tel,maths,phy,che).
5)Control statements:
Control statements
are used to control the flow of execution.
class ex{
public void
main(String arg[])
{
int a=10;
int b=5;
int c=a+b;
System.out.println(c);
}
}
Note:In the program execution will be is sequential order. if
we want to control the flow of execution
we should go for control statements.
1)if
2)if else
3)if else ladder.
4)Nested if
5)Switch
6)while loop.
7)Do while loop.
8)for loop.
9)break
10)continue
1)if
-The if statement checks the condition and than executes the
if block if the condition is true.
sy:
if(condition)
{
// if block
}
Ex:
int age=18;
if(age>=18) //checks the condition 18>=18
{
sop("Major"); //if block
}
--
output:
Major
2)if else
-if else statement tests the condtion first then it will execute the if block if condition is true otherwise it will execute the else block.
sy:
if(Condtion)
{
//if block
}
else
{
//else block
}
ex:
int age=18;
if(age>=18)
{
System.out.println("Major);
}else
{
Systrem.out.println("Miner");
}
3)if else ladder
-if else ladder is tests one or more condtions and then executes the block if condition is true.
Sy:
if(condition)
{
//block1
}else if(condtion)
{
//block2
}else if(condtion)
{
//block 3
}
-
-
else if(condition)
{
//block n
}
--
ex:
int marks=65;
if(marks<35) //65<35=false
{
System.out.println("Fail");
}else if(marks>=35 && marks<50) //65>=35 && 65<50=true&&false=false
{
System.out.println("Third");
}else if(marks>=50 && marks<60) //65>=50 &&65<60=true&&false=false
{
System.out.println("Second");
}else if(marks>=60 && marks<75) //65>=60 &&65<75=true&&true=true
{
System.out.println("First");
}else if(marks>=75)
{
System.out.println("Distinction");
}
output:
First
4)Nested If statement
-The Nested if statement includes the if statement with in the another if block or else block.
-inner block will executes only when the outer if condition is true.
Sy:
if(condition)
{
//outer block
if(condition)
{
/inner block
}
}
Ex:
int age=18;
int weight=60;
if(age>=18) //18>=18=true
{
if(weight>50) //60>50=true
{
System.out.println("You are eligible to donate blod");
}
}
5)Switch Statement
-Switch statement executes one block from multiple conditions.
-it is like if else ladder.
-it works with byte,short,int,long,string and some wrapper classes etc.
sy:
switch(condition)
{
case value1:
//block1
break;
case value2:
//block2
break;
-
-
-
default:
// defualt block
break;
}
Ex:
int day=2;
switch(day)
{
case 1:
System.out.println("Sunday");
break;
case 2:
System.out.println("Monday");
break;
case 3:
System.out.println("Tuesday");
break;
case 4:
System.out.println("Wednesday");
break;
case 5:
System.out.println("Thirsday");
break;
case 6:
System.out.println("Friday");
break;
case 7:
System.out.println("Saterday");
break;
default:
System.out.println("Invalid case");
break;
}
1)Program to determin the sex? 1-male,2-female.
2)Program to print the month name based on the number.1-January,2-February.
Java loops:
--loops are used to execute the block of statements several times.
1)while
2)Do while
3)For loop
1)while
-while loop is used to iterate the block of statements several times.
-This is entry control loop.
-if the no of iterations are not fixed than its recommennded to while loop.
Sy:
intialization
while(condition)
{
//block of statements
//increment/decrement
}
ex:
int i=1;
while(i<=10)
{
System.out.println(i);
i++;
}
-----
i=1 while(1<=10) = while(true)
1
i=2 while(2<=10)=while(true)
2
------
i=11 while(11<=10)=while(false)
2)Do while
-Do while is used to iterate the statements several times.
-Do while is executed the block atleat once becuase condtion is checked after the body.
-if the no of iteration is not fixed than we are going for the do while.
-this is exit control loop.
sy:
initialization;
do
{
//body
//incr/decr
}while(condition);
ex:
int i=1;
do
{
System.out.println(i);
i++;
}while(i<=10);
-----
i=1 prints 1
i=2 while(2<=10);=while(true);
prints 2 ,i=3 while(3<=10)=while(true);
---
Program to print the sum of 10 numbers.
ex:1 2 3 4 5 6 7 8 9 10=51
-The for loop is used to iterate the block several times until the condition is true.
-if the no of iterations are fixed then its recommended to use for loop.
1.Simple for loop.
2.Nested for loop.
3.Labled for loop.
4.For each loop(JDK 1.5).
1.Simple for loop
sy:
for(initilazation;condition;incr/decr)
{
//block of statements;
}
flow of execution:
Ionitialization->Condition-> if condtion is true then it will execute the body->incr/dec->condition
ex:
for(int i=1;i<=10;i++)
{
System.out.println(i);
}
--
output:
1
2
3
4
5
6
7
8
9
10
Nested for loop:
-For loop inside another for loop.
ex:
for(int i=1;i<=5;i++)
{
for(int j=1;j<=5;j++)
{
System.out.println(i+"-"+j);
}//inner loop
}//outer loop
output:
1-1
1-2
1-3
1-4
1-5
2-1
2-2
2-3
2-4
2-5
3-1
3-2
3-3
3-4
3-5
4-1
4-2
4-3
4-4
4-5
5-1
5-2
5-3
5-4
5-5
3)Labled for loop:
aa:
for(int i=1;i<=5;i++)
{
bb:
for(int j=1;j<=5;j++)
{
System.out.println(i+"-"+j);
}//inner loop
}//outer loop
4)For each loop
-For each loop is used to iterate the arrays or collections.
sy:
for(type variable:Array)
{
//body;
}
ex:
int a[]={1,2,3,4,5};
for(int i:a)
{
System.out.println(i);
}
output:
1
2
3
4
5
--Program to print the factorial number
input-5 input:6
output=120 output:720
5!=5*4*3*2*1 6!=6*5*4*3*2*1
9)Break statement:
-Break statement is used to break the loops(while,do while,for) or switch statement.
ex:
for(int i=1;i<=10;i++)
{
if(i==5)
{
break;
}
System.out.println(i);
}
output:
1
2
3
4
-In case of Nested loops it breaks only the inner loop.
Ex:
for(int i=1;i<=3;i++)
{
for(int j=1;j<=3;j++)
{
if(i==2 && j==2)
{
break;
}
System.out.println(i+"-"+j);
} //inner loop
} // outer loop
---
output:
1 1
1 2
1 3
2 1
3 1
3 2
3 3
-we can use break statement in while and do while as well.
ex: while
int i=1;
while(i<=10)
{
if(i==5)
{
break;
}
System.out.println(i);
i++;
}
--
output:
1
2
3
4
-How to use the Break in Labeld for loop.
ex:
aa:
for(int i=1;i<=3;i++)
{
bb:
for(int j=1;j<=3;j++)
{
if(i==2 && j==2)
{
break aa;
}
System.out.println(i+"-"+j);
}
}
Output:
1- 1
1 -2
1 -3
2 -1
Assignment:
1)Example to use the break in do while.
10)Continue statement
-Continue statement is skips the current iteration at specified condition and continue for the next iteration.
-Continue statement is applicable to loops only such as while,do while and for loop.
ex:
for(int i=1;i<=10;i++)
{
if(i==8)
{
continue;
}
System.out.println(i);
}
output:
1
2
3
4
5
6
7
9
10
Program to print the odd numbers 1-10 using continue statement.
logic: number is divisible by 2,its a even number.
number%2==0 - even, number%2!=0-odd
for(int i=1;i<=10;i++)
{
if(i%2==0)
{
Continue;
}
System.out.println(i);
}
output:
1
3
5
7
9
Assignment:
1)Example program using Continue statement with Do while and while.
2)Program to print the even numbers 1-10 using continue statement.
Arrays:
-Array is a collection of similar type of elements stored in continous memory locations.
-Array is fixed in length.
-we can store primitive type of elements or object types in an array.
int a[] ={10 20 30 40 50};
0 1 2 3 4 ->positions
Advantages:
-Code optimization:it makes the code optimized,we can retrieve data and sort data efficiently.
-Randam Access:we can get the data at any index.
Dissadvantages:
-we can store only fixed size of elements in an array.its not growable in nature.
-Java provides collection which grows automatically.
we can create two types of arrays in java.
1)Single dimentional array.
2)Multi dimentional array.
1)Single dimentional array.
1)Array declaration:
Sy:
DataType[] arrayName; or
DataType []arrayName; or
DataType arrayName[];
ex:
1)Declare integer array
int[] arr;
int []arr;
int arr[];
int arr[10];//invalid;
2)Declare float array.
float[] arr;
float []arr;
float arr[];
etc.
2)Instantiation/create an object of an Array:
sy:
arrayName=new Datatype[size];
ex:
arr=new int[10]; //we can store 10 integer elements
arr=new float[5]; //we can store 5 float elements.
arr=new char[5]; //we can store 5 char elements.
etc.
-we can instantiate the array at the time of declaration;
ex:
int arr[]=new int[5];
0 1 2 3 4
10 20 30 40 50
3)Array Initialization:
arr[0]=10;
arr[1]=20;
arr[2]=30;
arr[3]=40;
arr[4]=50;
-we can initialize an array at the time of array declaration.
ex:
int arr[]={10,20,30,40,50};
length=5
4)Traversing an array.
ex:
for(int i=0;i<arr.length;i++)
{
System.out.println(arr[i]);
}
output:
10
20
30
40
50
-we can traverse an array using for each loop also.
for(int i:arr)
{
System.out.println(i);
}
output:
10
20
30
40
50
-JVM will throws ArrayIndexOutOfBoundsException if the array index is negative or
greater than or equal to array size.
int a[]={10,20,30,40,50};
0 1 2 3 4
for(int i=0;i<=a.length;i++)
{
System.out.println(a[i]); //a[5]
}
5)Copying an array to another array.
sy:
public static void arraycopy(
Object src, int srcPos,Object dest, int destPos, int length
)
int source[]={10,20,30,40,50};
int des[]=new int[5];
System.arraycopy(source,1,des,0,source.length);
for(int i:des)
{
System.out.println(i));
}
output:
20
30
40
50
6)Cloning an array:
-we can make duplicate copy of an array.
int arr[]={10,20,30,40,50};
int dup[]=arr.clone();
for(int i:dup)
{
System.out.println(i);
}
output:
10
20
30
40
50
Example program:
int a[]=new int[5];//declaration and instantiation
a[0]=10;//initialization
a[1]=20;
a[2]=70;
a[3]=40;
a[4]=50;
//traversing array
for(int i=0;i<a.length;i++)//length is the property of array
{
System.out.println(a[i]);
}
output:
10
20
30
40
50
Program to find the min and max element in an array.
int a[]={10,20,30,40,50};
int min=a[0];
int max=a[0];
for(int i=0;i<a.length;i++)
{
if(min>a[i])
{
min=a[i];
}
if(max<a[i])
{
max=a[i];
}
}
System.out.println(min);
System.out.println(max);
Assigment:
1)Program to find sum of elements in an array.
2)Multi Dimentonal Array:
-it stores the similar elements in rows and columns.
ex:
1 2 3
4 5 6
7 8 9
-------
1)Declare Multi Dimentional array.
sy:
DataType[][] arr;
DataType [][]arr;
DataType arr[][];
DataType []arr[];
ex:Int array
int[][] arr;
int [][]arr;
int arr[][];
int []arr[];
etc.
2)Instantiation of multi dimensional array.
sy:
arrayName=new DataType[rowsize][columnsize];
ex:
arr=new int[3][3]; //3 rows and 3 columns
Array length=3*3=9
3)Initialization of multi dimentional array.
0th row
arr[0][0]=1;
arr[0][1]=2;
arr[0][2]=3;
1 2 3
1st row
arr[1][0]=4;
arr[1][1]=5;
arr[1][2]=6;
4 5 6
2nd row
arr[2][0]=7;
arr[2][1]=8;
arr[2][2]=9;
7 8 9
1 2 3
4 5 6
7 8 9
-we can initialize the elements at the time of declaration.
int arr[][]={{1,2,3},{4,5,6},{7,8,9}};
arr
1 2 3
4 5 6
7 8 9
3)Traverse Multi dimensional array:
ex:
for(int i=0;i<3;i++)
{
for(int j=0;j<3;j++)
{
System.out.print(arr[i][j]+" ");
}
System.out.println("");
}
output:
1 2 3
4 5 6
7 8 9
-Iterate the multi dimensional array using for each loop.
for(int i[]:arr)
{
for(int j:i)
{
System.out.print(j+" ");
}
System.out.println(" ");
}
output:
1 2 3
4 5 6
7 8 9
4)Copy of an multi dimensional array to another array.
ex:
int source[][]={{1,2,3,4,5},
{5,6},
{7,8,9}};
int des[][]=new int[source.length][];
for(int i=0;i<source.length;i++)
{
des[]=new int[source[i].length];
System.arraycopy(source[i],0,des[i],0,source[i].length);
}
5)Clone a multi dimensional array:
ex:
int source[][]={{1,2,3,4,5},
{5,6},
{7,8,9}};
int des[][]=source.clone();
Program for Addition of two matrix
int a[][]={{1,2,3},{4,5,6}};
int b[][]={{1,2,3},{4,5,6}};
int c[][]=new int[2][3];
a b c
1 2 3 1 2 3 2 4 6
4 5 6 4 5 6 8 10 12
for(int i=0;i<2;i++)
{
for(int j=0;j<3;j++)
{
c[i][j]=a[i][j]+b[i][j];
}
}
c[0][0]=1+1=2
c[0][1]=2+2=4
c[0][2]=3+3=6
c[1][0]=4+4=8
c[1][1]=5+5=10
c[1][2]=6+6+=12
output:
2 4 6
8 10 12
Assignment:
Program to subtract two matrix.
Program for Multiplication of two matrix:
int a[][]={{1,1,1},{2,2,2},{3,3,3}};
int b[][]={{1,1,1},{2,2,2},{3,3,3}};
int c[][]=new int[3][3];
for(int i=0;i<3;i++)
{
for(int j=0;j<3;j++)
{
c[i][j]=0;
for(int k=0;k<3;k++)
{
c[i][j]=c[i][j]+a[i][j]*b[k][j];
}
}
}
a b c
1 1 1 1 1 1 6 6 6
2 2 2 2 2 2 12 12 12
3 3 3 3 3 3 18 18 18
c[i][j]=c[i][j]+a[i][j]*b[k][j]
1st row
-------
i=0,j=0
c[0][0]=a[0][0]*b[0][0]+a[0][0]*b[1][0]+a[0][0]*b[2][0]
c[0][1]=a[0][1]*b[0][0]+a[0][1]*b[1][1]+a[0][1]*b[2][1]
c[0][2]=a[0][2]*b[0][2]+a[0][2]*b[1][2]+a[0][2]*b[2][2]
2nd row
--------
c[1][0]=a[1][0]*b[0][0]+a[1][0]*b[1][0]+a[1][0]*b[2][0]
c[1][1]=a[1][1]*b[0][1]+a[1][1]*b[1][1]+a[1][1]*b[2][1]
c[1][2]=a[1][2]*b[0][2]+a[1][2]*b[1][2]+a[1][2]*b[2][2]
3rd row
--------
c[2][0]=a[2][0]*b[0][0]+a[2][0]*b[1][0]+a[2][0]*b[2][0]
c[2][1]=a[2][1]*b[0][1]+a[2][1]*b[1][1]+a[2][1]*b[2][1]
c[2][2]=a[2][2]*b[0][2]+a[2][2]*b[1][2]+a[2][2]*b[2][2]
0th element
c[0][0]=0+1*1=1
c[0][0]=1+1*2=3
c[0][0]=3+1*3=6
1st element
c[0][1]=0+1*1=1
c[0][1]=1+1*2=3
c[0][1]=3+1*3=6
2nd element
c[0][2]=0+1*1=1
c[0][2]=1+1*2=3
c[0][2]=3+1*3=6
4th element
c[1][0]=0+2*1=2
c[1][0]=2+2*2=6
c[1][0]=6+2*3=12
5th element
c[1][1]=0+2*2=4
c[1][1]=2+2*2=6
c[1][1]=6+2*3=12
output:
6 6 6
12 12 12
18 18 18
Java Scanner:
----------
-Java scanner is found in java.util package and this is used to read the input from keyboard.
-Java scanner class provides nextXXX() methods such as next(),nextLine(),nextByte(),nextShort(),nextInt(),nextLong(),
nextChar(),nextBoolean(),nextFloat(),nextDouble() etc.
ex:
int a=10;
int b=20;
String name="samidi";
char gender='M';
long height=172;
Scanner sc=new Scanner(System.in);
System.out.println("Enter an integer value:");
int n=sc.nextInt();
System.out.println("Enter your name:");
String name=sc.nextLine();
System.out.println("Enter your salary:");
Double sal=sc.nextDouble();
1)Program to print the fibonacci series
input:10
output:0 1 1 2 3 5 8
2)Program to print prime numbers of length n
input:10
output:2 3 5 7
OOPS:
-Object Oriented Programming is a methodology or paradigm to design a program using object and classes.
Object Oriented programming
|
Procedure oriented programming
|
|
|
-It simplifies the software development and maintenance by using the concepts like
1)object
2)class
3)Inheritance
4)Encapsulation
5)Abstraction
6)Polymarphism
etc.
Apart from this there are other terms are in oops concepts are:
1)Coupling
2)Cohesion
3)Association
4)Aggregation
5)Composition
etc.
Advantages of oops over procedure oriented programming.
1)oops makes the development and maintenance easier where as procedure oriented programming its not easy to maintain if code grows.
2)oops is more secure than procedure oriented programming because oops provides data hiding where as
procedure oriented ,the global variable can be accessed any where.
3)oops provides the ability to simulate the real world entity more effectively.
1)Object:
Any entity that has state and behavior is known as an object. For example, a chair, pen, table, keyboard, bike, etc. It can be physical or logical.

-For example a Pen,a student, a Dog,a Bike etc.
1)Pen:
State:Model,color,price etc.
Behavior:write
2)Student:
State:id,name,age,color,gender,dob,address etc.
Behavior:Reading,writing,playing etc.
3)Dog
State:name,color.
Behavior:Barking,eating etc.
4)Car
State:name,model,price,color,speed etc.
Behavior:Ride
What is a class in Java
A class is a group of objects which have common properties. It is a template or blueprint from which objects are created. It is a logical entity. It can't be physical.
A class in Java can contain:
- Fields
- Methods
- Constructors
- Blocks
- Nested class and interface

Syntax to declare a class:
class <class_name>{
field;
method;
}
File: Student.java
There are 3 ways to initialize object in Java.
- By reference variable
- By method
- By constructor
1) Initialization through reference
Initializing an object means storing data into the object. Let's see a simple example where we are going to initialize the object through a reference variable.
File: TestStudent2.java
Output:
101 Sonoo
We can also create multiple objects and store information in it through reference variable.
File: TestStudent3.java
Output:
101 Sonoo
102 Amit
2) Initialization through method
Output:
111 Karan
222 Aryan
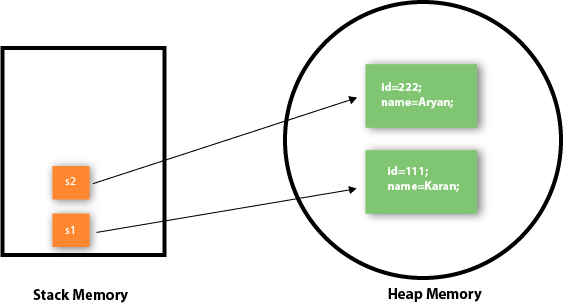
As you can see in the above figure, object gets the memory in heap memory area. The reference variable refers to the object allocated in the heap memory area. Here, s1 and s2 both are reference variables that refer to the objects allocated in memory.
3) Initialization through a constructor
We will learn about constructors in Java later.
Object and Class Example: Employee
Output:
101 ajeet 45000.0
102 irfan 25000.0
103 nakul 55000.0
Constructors in Java:
In Java, a constructor is a block of codes similar to the method. It is called when an instance of the class is created. At the time of calling constructor, memory for the object is allocated in the memory.
It calls a default constructor if there is no constructor available in the class. In such case, Java compiler provides a default constructor by default.
There are two types of constructors in Java: no-arg constructor, and parameterized constructor.
Rules for creating Java constructor
There are two rules defined for the constructor.
- Constructor name must be the same as its class name
- A Constructor must have no explicit return type
- A Java constructor cannot be abstract, static, final, and synchronized
- A Java constructor can be used Access specifiers like private,default,protected,public.
Difference between constructor and method in Java
There are many differences between constructors and methods. They are given below.
| Java Constructor | Java Method |
|---|---|
| A constructor is used to initialize the state of an object. | A method is used to expose the behavior of an object. |
| A constructor must not have a return type. | A method must have a return type. |
| The constructor is invoked implicitly. | The method is invoked explicitly. |
| The Java compiler provides a default constructor if you don't have any constructor in a class. | The method is not provided by the compiler in any case. |
| The constructor name must be same as the class name. | The method name may or may not be same as the class name. |
Types of Java constructors
There are two types of constructors in Java:
- Default constructor (no-arg constructor)
- Parameterized constructor.
Java Default Constructor
A constructor is called "Default Constructor" when it doesn't have any parameter.
Syntax of default constructor:
Example of default constructor
| In this example, we are creating the no-arg constructor in the Bike class. It will be invoked at the time of object creation. |
Output:
Bike is created
Java Parameterized Constructor
A constructor which has a specific number of parameters is called a parameterized constructor.
Why use the parameterized constructor?
The parameterized constructor is used to provide different values to distinct objects. However, you can provide the same values also.
Example of parameterized constructor
Output:
111 Karan
222 Aryan
Constructor Overloading in Java
In Java, a constructor is just like a method but without return type. It can also be overloaded like Java methods.
Example of Constructor Overloading
Output:
111 Karan 0
222 Aryan 25
There is no copy constructor in Java. However, we can copy the values from one object to another like copy constructor in C++.
There are many ways to copy the values of one object into another in Java. They are:
- By constructor
- By assigning the values of one object into another
- By clone() method of Object class
In this example, we are going to copy the values of one object into another using Java constructor.
Output:
111 Karan
111 Karan
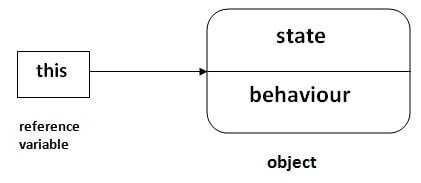
this keyword in java
There can be a lot of usage of java this keyword. In java, this is a reference variable that refers to the current object.
Here is given the usage of java this keyword.
- this can be used to refer current class instance variable.
- this can be used to invoke current class method (implicitly)
- this() can be used to invoke current class constructor.
1) this: to refer current class instance variable
The this keyword can be used to refer current class instance variable. If there is ambiguity between the instance variables and parameters, this keyword resolves the problem of ambiguity.
Understanding the problem without this keyword
| Let's understand the problem if we don't use this keyword by the example given below: |
Output:
0 null 0.0
0 null 0.0
In the above example, parameters (formal arguments) and instance variables are same. So, we are using this keyword to distinguish local variable and instance variable.
Solution of the above problem by this keyword
Output:
111 ankit 5000
112 sumit 6000
If local variables(formal arguments) and instance variables are different, there is no need to use this keyword like in the following program:
2) this: to invoke current class method
You may invoke the method of the current class by using the this keyword. If you don't use the this keyword, compiler automatically adds this keyword while invoking the method. Let's see the example
Test it Now
Output:
hello n
hello m
3) this() : to invoke current class constructor
The this() constructor call can be used to invoke the current class constructor. It is used to reuse the constructor. In other words, it is used for constructor chaining.
Calling default constructor from parameterized constructor:
Output:
hello a
10
Encapsulation in Java
Encapsulation in Java is a process of wrapping code and data together into a single unit, for example, a capsule which is mixed of several medicines.
We can create a fully encapsulated class in Java by making all the data members of the class private. we can use setter and getter methods to set and get the data in it.
The Java Bean class is the example of a fully encapsulated class.

Advantage of Encapsulation in Java:
- By providing only a setter or getter method, you can make the class read-only or write-only.
- It provides you the control over the data.
- It is a way to achieve data hiding in Java because other class will not be able to access the data through the private data members.
Example of Encapsulation:
Let's see the simple example of encapsulation that has only one field with its setter and getter methods.
File: Student.java
File: Test.java
Output:
vijay
Java Package
A java package is a group of similar types of classes, interfaces and sub-packages.
Package in java can be categorized in two form, built-in package and user-defined package.
There are many built-in packages such as java, lang, awt, javax, swing, net, io, util, sql etc.
A java package is a group of similar types of classes, interfaces and sub-packages.
Package in java can be categorized in two form, built-in package and user-defined package.
There are many built-in packages such as java, lang, awt, javax, swing, net, io, util, sql etc.
Advantage of Java Package
1) Java package is used to categorize the classes and interfaces so that they can be easily maintained.
2) Java package provides access protection.
3) Java package removes naming collision.

1) Java package is used to categorize the classes and interfaces so that they can be easily maintained.
2) Java package provides access protection.
3) Java package removes naming collision.
Example of java package
package pack1;
public class A
{
public void m1()
{
System.out.println("In pack1");
}
}
Test.java
package pack2;
import pack1.*
public class Test
{
public static void main(String arg[])
{
A oa=new A();
oa.m1();
}
}
output:
In pack1
package pack1;
public class A
{
public void m1()
{
System.out.println("In pack1");
}
}
Test.java
package pack2;
import pack1.*
public class Test
{
public static void main(String arg[])
{
A oa=new A();
oa.m1();
}
}
output:
In pack1
How to access package from another package?
There are three ways to access the package from outside the package.
- import package.*;
- import package.classname;
- fully qualified name.
Inheritance
There are three ways to access the package from outside the package.
- import package.*;
- import package.classname;
- fully qualified name.
Inheritance
It is a process of deriving super class properties and behaviors into sub class is known as Inheritance.
It helps to reuse the code and establish a relationship between different classes.
It helps to reuse the code and establish a relationship between different classes.

As we can see in the image, a child inherits the
properties from his father. Similarly, in Java, there are two classes:
1. Parent class ( Super or Base class)
2. Child class (Subclass or Derived class )
Inheritance represents the IS-A relationship which is also known as a parent-child relationship.
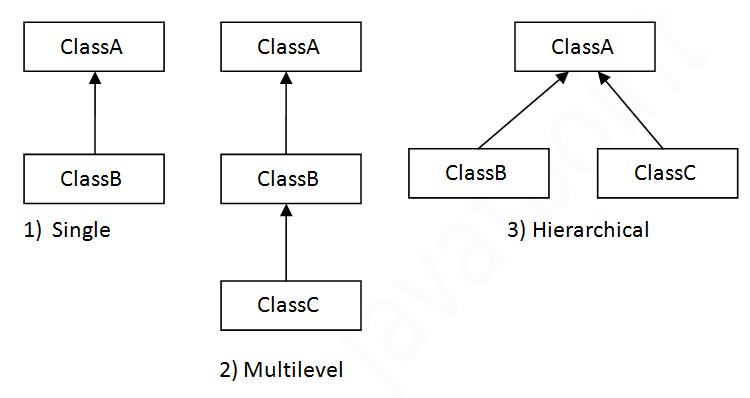
Types of inheritance in java
On the basis of class, there can be three types of inheritance in java: single, multilevel and hierarchical.
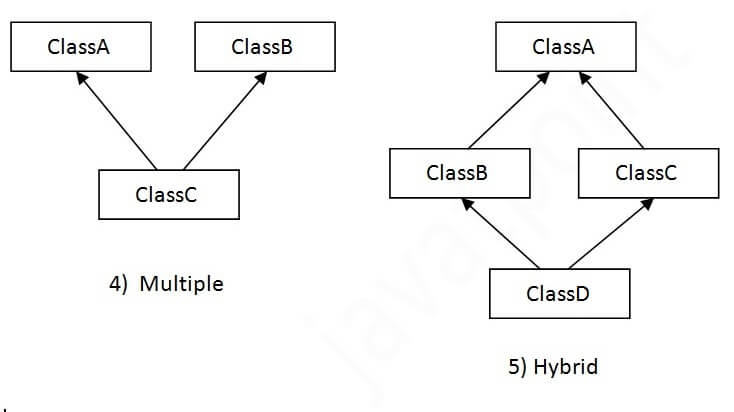
In java programming, multiple and hybrid inheritance is supported through interface only. We will learn about interfaces later.
When one class inherits multiple classes, it is known as multiple inheritance. For Example:
- Single Inheritance:

In single inheritance, one class inherits the
properties of another. It enables a derived class to inherit the
properties and behaviour from a single parent class.
Here, Class A is your parent class and
Class B is your child class which inherits the properties and behaviour of the
parent class.
Let’s see the syntax for single inheritance:
class A{
int a=10;
}
class B extends A
{
int b=20;
//int a=10; here a is derived from class A
}

When a class is derived from a class which is also derived from another class, such type of inheritance is called Multilevel Inheritance.
If we talk about the flowchart, class B inherits the properties and behavior of class A and class C inherits the properties of class B.
Let’s see the syntax for multilevel inheritance in Java:
class A
{
int a=10;
}
class B extends A
{
int b=20;
//int a=10; here a is dervied from class A
}
class C extends B
{
int c=30;
//int a=10; here a is dervied from class A
//int b=10; here a is dervied from class B
}
3. Hierarchical Inheritance:

When a class has more than one child classes (sub classes) such kind of inheritance is known as hierarchical.
If we talk about the flowchart, Class B and C are the child classes which are inheriting from the parent class i.e Class A.
Let’s see the syntax for hierarchical inheritance in Java:
class A{
int a=10;
}
class B extends A
{
int b=20;
//int a=10; here a is dervied from class A
}
class C extends A
{
int c=30;
//int a=10; here a is dervied from class A
}
Polymorphism:
Polymorphism means taking many forms, where ‘poly’ means many and ‘morph’ means forms. Polymorphism allows you define one method and have multiple implementations.
Let’s understand this by taking a real-life example and how this concept fits into Object oriented programming.

Let’s consider this real world scenario in cricket, we know that there are different types of bowlers.
i.e. Fast bowlers, Medium pace bowlers and spinners. As you can see in the above figure,
there is a parent class- BowlerClass and it has three child classes: FastPacer, MediumPacer and Spinner.
Bowler class has bowlingMethod() where all the child classes are inheriting this method.
As we all know that a fast bowler will going to bowl differently as compared to medium pacer and spinner in terms of bowling speed, long run up and way of bowling, etc.
All the three classes above inherited the bowlingMethod() but their implementation is totally different from one another.
Polymorphism is classified into two types:
- Method over loading(Compile time polymorphism)
- Method Overriding(Run time polymorphism)
1.Method Over loading(Compile time polymorphism)
If a class has multiple methods having same name but different in parameters, it is known as Method Overloading.
ex:
int sum(int a,int b);//to perform sum of two numbers
int sum(int a,int b,int c); //to Perform sum of three numbers.
int sum(double a,double b);//to perform sum two numbers of type double.
There are two ways to overload the method in java
- By changing number of arguments
- By changing the data type
1) Method Overloading: changing no. of arguments
In this example, we have created two methods, first add() method performs addition of two numbers and second add method performs addition of three numbers.
Output:
22
33
2) Method Overloading: changing data type of arguments
In this example, we have created two methods that differs in data type. The first add method receives two integer arguments and second add method receives two double arguments.
Output:
22
24.9
Note:
1.Method overloading is not possible by changing the return type of the method only because of ambiguity.
ex:
int add(int a,int b){return a+b;}
double add(int a,int b){return a+b;}
Output:
Compile Time Error: method add(int,int) is already defined in class Adder
2.we can over load the main method in java.But JVM calls main() method which receives string array as arguments only.
Output:
main with String[]
3.Method overloading and Type Promotion.
One type is promoted to another implicitly if no matching datatype is found. Let's understand the concept by the figure given below:
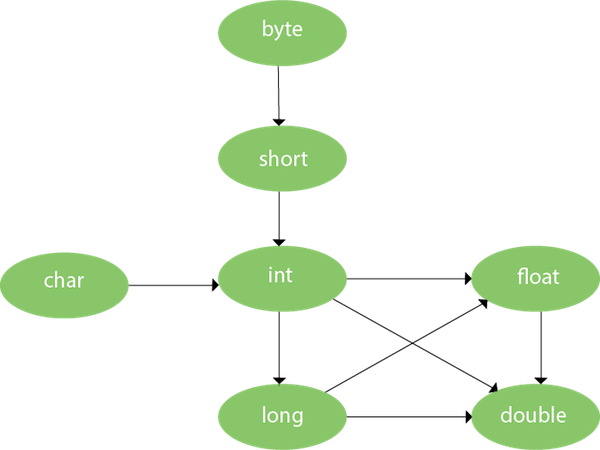
As displayed in the above diagram, byte can be promoted to short, int, long, float or double. The short datatype can be promoted to int,long,float or double. The char datatype can be promoted to int,long,float or double and so on.
Example:
Output:40
       60.0
2.Run time polymorphism:
In Java, runtime polymorphism is a process of rewriting the methods in child class with same signatures.
Method overriding is an example of run time polymorphism in which a call to an overridden method is resolved at run time rather than at compile-time.
Rules of method overriding:
- The method must have the same name as in the parent class
- The method must have the same parameter as in the parent class.
- There must be an IS-A relationship (inheritance).
- if Sub class throws an Exception than super class super exception.
Consider a scenario where Bank is a class that provides functionality to get the rate of interest. However, the rate of interest varies according to banks. For example, SBI, ICICI and AXIS banks could provide 8%, 7%, and 9% rate of interest.
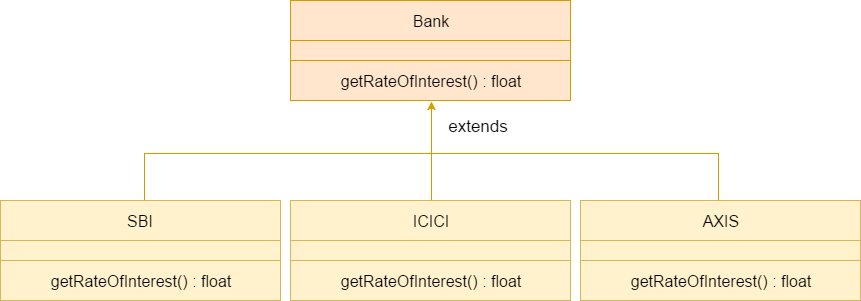
Output:
SBI Rate of Interest: 8
ICICI Rate of Interest: 7
AXIS Rate of Interest: 9
Notes:
1)we cannot override a static method because static methods are belongs to class member.
2)we cannot override the main method.
Difference between Method overloading and Method overriding.
| No. | Method Overloading | Method Overriding |
|---|---|---|
| 1) | Method overloading is used to increase the readability of the program. | Method overriding is used to provide the specific implementation of the method that is already provided by its super class. |
| 2) | Method overloading is performed within class. | Method overriding occurs in two classes that have IS-A (inheritance) relationship. |
| 3) | In case of method overloading, parameter must be different. | In case of method overriding, parameter must be same. |
| 4) | Method overloading is the example of compile time polymorphism. | Method overriding is the example of run time polymorphism. |
| 5) | In java, method overloading can't be performed by changing return type of the method only. Return type can be same or different in method overloading. But you must have to change the parameter. | Return type must be same or covariant in method overriding. |
Abstraction in Java
Abstraction is a process of hiding the implementation details and showing only functionality to the user
Abstraction lets you focus on what the object does instead of how it does it.
Ways to achieve Abstraction
There are two ways to achieve abstraction in java
- Abstract class (0 to 100%)
- Interface (100%)
Abstract class in Java
A class which is declared with the abstract keyword is known as an abstract class in Java. It can have abstract and non-abstract methods (method with the body).
Points to Remember
- An abstract class must be declared with an abstract keyword.
- It can have abstract and non-abstract methods
- It can have constructors.
- We can not create instance for abstract class.
- We need to extend the abstract class and provide the implementation for the abstract methods in the class.
- if we are not provided the implementation of abstract method in the child class than that class will become abstract class.
- We can extend both abstract and non abstract classes into the abstract class.
Example of Abstract class
drawing circle
Abstract class is having Data Constructor,concrete methods:
File: TestAbstraction2.java
       bike is created
       running safely..
       gear changed
Interface in java
An interface in java is a blueprint of a class. It has public static final variables and public abstract methods.
Points to remember in the interfaces :
1.An interface contains only public static final variables.
2.it contains only public abstract methods till java 7,from java 8 on wards an interface contains default and static methods.
Points to remember in the interfaces :
1.An interface contains only public static final variables.
2.it contains only public abstract methods till java 7,from java 8 on wards an interface contains default and static methods.
3.It cannot be instantiated just like the abstract class.
4.we should provide the implementation for the abstract methods of interface in the child class.
5.if we are not providing the implementation for the abstract methods than the child class will become Abstract class.
6.A class can be implements an interface but class cannot extended the interface.
7.An interface can be extended into another interface.
8.An interface supports multiple inheritance so that an interface can have multiple of its parents.
Syntax:
Below are the valid/invalid variable declarations in interface:
public static final int a=10;//valid
static final int a=10;//valid
public final int a=10;//valid
public static int a=10;//valid
int a=10;//valid
private static final int a=10;//Invalid
public transient final int a=10;//Invalid
public syncronized final int a=10;//Invalid,syncronized is used for method and blocks only.
protected static final int a=10;//Invalid
private abstract int a=10;//Invalid,abstract is used for class and methods only.
Below are the valid/invalid method declarations in interface:
public abstract void m1();//valid
public abstract int m1();//valid
public void m1();//valid
abstract void m1();//valid
void m1();//valid
private abstract void m1();//invalid
private void m1();//invalid
protected abstract void m1();//invalid
public final void m1();//invalid
public abstract synchronized void m1();//invalid
public static void m1();//invalid
public abstract static void m1();//invalid
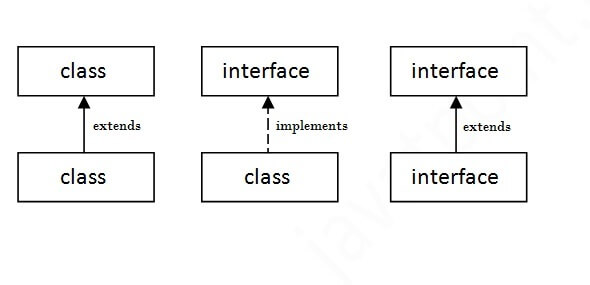
The relationship between classes and interfaces
As shown in the figure given below, a class extends another class, an interface extends another interface, but a class implements an interface.
Java Interface Example: Bank
Let's see another example of java interface which provides the implementation of Bank interface.
File: TestInterface2.java
Output:
ROI: 9.15
Interface inheritance:
A class implements an interface, but one interface extends another interface.
Output:
Hello
Welcome
Multiple inheritance in Java by interface:
If a class implements multiple interfaces, or an interface extends multiple interfaces, it is known as multiple inheritance.

Output:Hello
       Welcome
Difference between abstract class and interface
Abstract class and interface both are used to achieve abstraction where we can declare the abstract methods. Abstract class and interface both can't be instantiated.
But there are many differences between abstract class and interface that are given below.
| Abstract class | Interface |
|---|---|
| 1) Abstract class can have abstract and non-abstract methods. | Interface can have only abstract methods. Since Java 8, it can have default and static methods also. |
| 2) Abstract class doesn't support multiple inheritance. | Interface supports multiple inheritance. |
| 3) In Abstract class we can declare the variables with any modifiers. | Interface has only public ,static and final variables. |
| 4) Abstract class can provide the implementation of interface. | Interface can't provide the implementation of abstract class. |
| 5) The abstract keyword is used to declare abstract class. | The interface keyword is used to declare interface. |
| 6) An abstract class can extend another Java class and implement multiple Java interfaces. | An interface can extend another Java interface only. |
| 7) An abstract class can be extended using keyword "extends". | An interface can be implemented using keyword "implements". |
| 8) A Java abstract class can have class members like private, protected, etc. | Members of a Java interface are public by default. |
| 9)Example: public abstract class Shape{ public abstract void draw(); } | Example: public interface Drawable{ void draw(); } |
Simply, abstract class achieves partial abstraction (0 to 100%) whereas interface achieves fully abstraction (100%).
Access Modifiers in Java
There are two types of modifiers in Java: access modifiers and non-access modifiers.
The access modifiers in Java specifies the accessibility or scope of a field, method, constructor, or class.
There are four types of Java access modifiers:
- Private
- Default
- Protected
- Public
There are many non-access modifiers, such as
- static
- abstract
- final
- synchronized
- volatile
- native
- transient
1) Private
- The Private access modifier is applicable with variables ,methods ,constructors and inner classes.
- The private access modifier is accessible only within the class.
Simple example of private access modifier
2) Default
- This is applicable for class,interface,variables,methods,constructors and inner classes.
- If you don't use any modifier, it is treated as default by default.
- The default modifier is accessible only within package. It cannot be accessed from outside the package.
Example of default access modifier
In the above example, the scope of class A and its method msg() is default so it cannot be accessed from outside the package.
3) Protected
- This is applicable for variables ,methods,constructors and inner classes.
- The protected access modifier is accessible within package and outside the package through inheritance only.
Example of protected access modifier
Output:Hello
4) Public
- This is applicable for class,variables,methods,constructors and inner classes.
- The public access modifier is accessible everywhere. It has the widest scope among all other modifiers.
Example of public access modifier
Understanding Java Access Modifiers
| Access Modifier | within class | within package | outside package by subclass only | outside package |
|---|---|---|---|---|
| Private | Y | N | N | N |
| Default | Y | Y | N | N |
| Protected | Y | Y | Y | N |
| Public | Y | Y | Y | Y |
Non-Access Modifiers:
1.static:
- This is applicable to variables ,methods,blocks and inner classes.
- A static member is common to all the instances (or objects) of the class because it is a class level variable.Hence we can access with class name.
- Static members are initialized at the time of class loading before object creation.
- Non static members cannot be access from static context.
class JavaExample{
  static int age;
  static String name;
//This is a Static Method static void disp(){ System.out.println("Age is: "+age); System.out.println("Name is: "+name); } // This is also a static method public static void main(String args[]) { age = 30; name = "vishnu"; disp(); } }
- static {
- //static block
- System.out.println("Hi, I'm a Static Block!");
- }
Output:
Hi, I'm a Static Block!
Age is: 30
Name is: vishnu
2.abstract
Bike is Running
{
for(int i=1;i<=5;i++)
{
System.out.println(i);
}
}
2)synchronized block
void print()
{
synchronized(this)
{
System.out.println("Hi");
}
}
NOTE: It’s strongly recommended that all serializable classes define the serialVersionUID constant as declared in the User class above:
- The abstract modifier is applicable to class and methods.
- The abstract modifier is used to achieve abstraction in Java.
Syntax:-
Rules of abstract keyword
- An abstract keyword can only be used with class and method and cannot be used with variables and constructors.
- If a method is abstract, it doesn't contain the body.
- We cannot use the abstract keyword with the final.
- We cannot declare abstract methods as private.
- We cannot declare abstract methods as static.
- An abstract method can't be synchronized.
Example :
Output:
Bike is Running3.Final
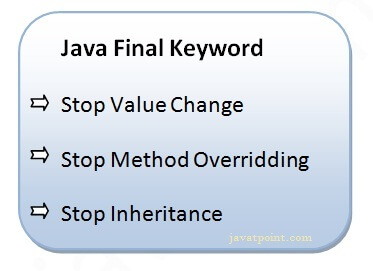
The java final keyword can be used in many context. Final can be:
- variable
- method
- class
1) final variable
If you make any variable as final, you cannot change the value of final variable(It will be constant).
Example:
Output:Compile Time Error
2) Java final method
If you make any method as final, you cannot override it.
Example:
Output:Compile Time Error
3) final class
If you make any class as final, you cannot extend it.
Example:
Output:Compile Time Error
4.Synchronization
- The synchronized keyword is used for methods and blocks.
- Synchronized method is used to lock an object for any shared resource.
- When a thread invokes a synchronized method, it automatically acquires the lock for that object and releases it when the thread completes its task.
Example:
1)synchronized method
synchronized void print(){
for(int i=1;i<=5;i++)
{
System.out.println(i);
}
}
2)synchronized block
void print()
{
synchronized(this)
{
System.out.println("Hi");
}
}
5.Volatile
- The volatile keyword used with variables only and cannot be used with classes or methods.
- Volatile keyword is used to modify the value of a variable by different threads. It is also used to make classes thread safe.
- The volatile keyword does not cache the value of the variable and always read the variable from the main memory.
In the above example, static variables are class members that are shared among all objects. There is only one copy in the main memory. The value of a volatile variable will never be stored in the cache. All read and write will be done from and to the main memory.
6.native
native is a modifier applicable only for methods and we can’t apply it anywhere else.
The methods which are implemented in C, C++ are called as native methods or foreign methods.
The main objectives of native keyword are:
- To improve performance of the system.
- To achieve machine level/memory level communication.
- To use already existing legacy non-java code.
7.Transient
- transient is applicable only on variables.
- Java transient keyword is used in serialization. If you define any data member as transient, it will not be serialized.
- serialization is the process of writing the state of java object into byte stream.
- De-serialization is the process of reading the byte stream into java format.
serialization :
Serialization is a mechanism of writing the state of object into a byte stream.The String class and all wrapper classes implements Serializable interface bydefault.
Let's create a class with transient variable.
Now write the code to serialize the object.
Output:
success
Now write the code for deserialization.
211 ravi 0
As you can see, printing age of the student returns 0 because value of age was not serialized.
NOTE: It’s strongly recommended that all serializable classes define the serialVersionUID constant as declared in the User class above:
1
public static final long serialVersionUID = 1234L;
This helps the de-serialization process keeps re-constructing the objects correctly when the serializable classes get changed overtime, and avoid the InvalidClassException.
1
| public static final long serialVersionUID = 1234L; |
Externalization:
Externalization used for custom Serialization, where we can decide what to store in stream.
Externalizable interface present in java.io, is used for Externalization which extends Serializable interface.
// to read object from stream
void readExternal(ObjectInput in)

// to write object into stream
void writeExternal(ObjectOutput out)
import java.util.*;import java.io.*;public class User implements Externalizable { public static final long serialVersionUID = 1234L; // attributes private String name; private String password; public User() { }
public User(String name,String password)
{
this.name=name;
this.password=password;
}
public void writeExternal(ObjectOutput out) throws IOException { out.writeObject(name); // write empty password: out.writeObject(""); }
public void readExternal(ObjectInput in) throws ClassNotFoundException, IOException {
this.name = (String) in.readObject();
this.password = (String) in.readObject();
}
public String toString() { String details = details += "\nName: " + name; details += "\nPassword: " + password; return details;}
}
ExternalizationDemo.java
import java.util.*;import java.io.*;/** * Externalization Demo Program. * @author www.codejava.net */public class ExternalizationDemo { private String filePath = "user.txt"; public void serialize() throws IOException { User user = new User(); user.setName("vishnu); user.setPassword("secret123"); // serialize object's state FileOutputStream fos = new FileOutputStream(filePath); ObjectOutputStream outputStream = new ObjectOutputStream(fos); outputStream.writeObject(user); outputStream.close(); System.out.println("User's details before serialization:\n" + user); System.out.println("Serialization done"); } public void deserialize() throws ClassNotFoundException, IOException { FileInputStream fis = new FileInputStream(filePath); ObjectInputStream inputStream = new ObjectInputStream(fis); User user = (User) inputStream.readObject(); inputStream.close(); System.out.println("User's details afeter de-serialization:\n" + user); } public static void main(String[] args) throws ClassNotFoundException, IOException { ExternalizationDemo demo = new ExternalizationDemo(); demo.serialize(); System.out.println("\n=============\n"); demo.deserialize(); }}
Output:User's details before serialization:
Name: Tom
Password: secret123
Serialization done
=============
User's details afeter de-serialization:
Name: Tom
Password:
IS-A Relationship:
IS-A relationship is also known as Inheritance.
By using extends keyword we can implement the IS-A relationship.
The advantage of IS-A relationship is code re-usability.
HAS-A relationship:
Has-A relationship is also known as composition or aggregation.
By using new keyword we can implement HAS-A relationship.
The advantage of HAS-A relationship is code re-usability.
The dis advantage of HAS-A relationship is it increases the dependencies between the class.
Composition is an association represents a part of a whole relationship where a part cannot exist without a whole. If a whole is deleted then all parts are deleted. It has a stronger relationship.

class Car
{
Engine e=new Engine();
}
In the above example Engine cannot exists without car.if we delete the car object then engine object will be
deleted by automatically.
Aggregation:
If a class have an entity reference, it is known as Aggregation. Aggregation represents HAS-A relationship.
Consider a situation, Employee object contains many informations such as id, name, emailId etc. It contains one more object named address, which contains its own informations such as city, state, country, zipcode etc. as given below.
example:
class Employee
{
int id;
String name;
Address add;
}
class Address
{
String city;
String state;
String country;
int zipcode;
}
Here in the above example Address can exits without Employee,so if Employee object is deleted than the address will not be deleted.
Exception Handling
The Exception Handling is the mechanism to handle the run time errors so that we can maintain the normal flow of execution.
What is Exception in Java
Dictionary Meaning: Exception is an abnormal condition.
In Java, an exception is an event that disrupts the normal flow of the program. It is an object which is thrown at run time.
Advantage of Exception Handling
The core advantage of exception handling is to maintain the normal flow of the application. An exception normally disrupts the normal flow of the application that is why we use exception handling. Let's take a scenario:
Suppose there are 10 statements in your program and there occurs an exception at statement 5, the rest of the code will not be executed i.e. statement 6 to 10 will not be executed. If we perform exception handling, the rest of the statement will be executed. That is why we use exception handling in Java.
Hierarchy of Java Exception classes
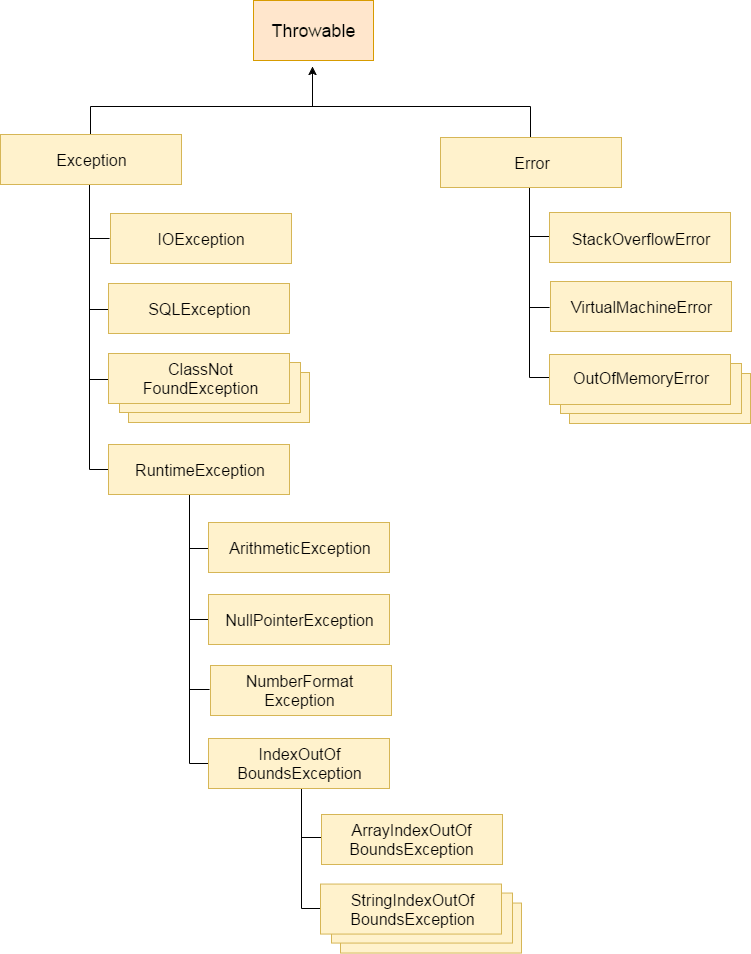
Types of Java Exceptions
There are mainly two types of exceptions:
- Checked Exception
- Unchecked Exception
- Error
1) Checked Exception
The classes which directly inherit Throwable class except RuntimeException and Error are known as checked exceptions e.g. IOException, SQLException etc. Checked exceptions are checked at compile-time.if we are not checked exceptions compiler will throw compile time errors.
2) Unchecked Exception
The classes which inherit RuntimeException are known as unchecked exceptions e.g. ArithmeticException, NullPointerException, ArrayIndexOutOfBoundsException etc. Unchecked exceptions are not checked at compile-time, but they are checked at run time.
3) Error
Error is irrecoverable e.g. OutOfMemoryError, VirtualMachineError, AssertionError etc.
Common Scenarios of Java Exceptions:
There are given some scenarios where unchecked exceptions may occur. They are as follows:
1) A scenario where ArithmeticException occurs
If we divide any number by zero, there occurs an ArithmeticException.
2) A scenario where NullPointerException occurs
If we have a null value in any variable, performing any operation on the variable throws a NullPointerException.
3) A scenario where NumberFormatException occurs
The wrong formatting of any value may occur NumberFormatException. Suppose I have a string variable that has characters, converting this variable into digit will occur NumberFormatException.
4) A scenario where ArrayIndexOutOfBoundsException occurs
If you are inserting any value in the wrong index, it would result in ArrayIndexOutOfBoundsException as shown below:
Java try-catch block
Java try block is used to enclose the code that might throw an exception. It must be used within the method.
Java catch block is used to handle the Exception by declaring the type of exception within the parameter
Java try block must be followed by either catch or finally block.
You can use multiple catch block with a single try block.
Syntax of Java try-catch
Syntax of try-finally block
Syntax of try-catch-finally block
Problem without exception handling
Let's try to understand the problem if we don't use a try-catch block.
Example 1
Output:
Exception in thread "main" java.lang.ArithmeticException: / by zero
As displayed in the above example, the rest of the code is not executed
Solution by exception handling
Let's see the solution of the above problem by a java try-catch block.
Example 2
Output:
java.lang.ArithmeticException: / by zero
rest of the code
Now, as displayed in the above example, the rest of the code is executed
Example 3
Here, we handle the exception using the parent class exception.
finally block
Java finally block is a block that is used to execute important code such as closing connection, stream etc.
Java finally block is always executed whether exception is handled or not.
Java finally block follows try or catch block.
class FinallyTest
{
public static void main(String arg[])
{
try
{
int a=50/10;
System.out.println(a);
}catch(ArithmaticException e)
{
System.out.println(e);
}
finally
{
System.out.println("clean up");
}
}
}
Output:
5
clean up
Java catch multiple exceptions:
A try block can be followed by one or more catch blocks. Each catch block must contain a different exception handler.
- At a time only one exception occurs and at a time only one catch block is executed.
- All catch blocks must be ordered from most specific to most general, i.e. catch for ArithmeticException must come before catch for Exception.
Comments
Post a Comment